What is mean by Test Plan & WorkBench in JMeter. We are covering how to add and remove JMeter Elements, How to Load and Save JMeter Elements. Alongwith that we are covering how we configure Jmeter Elements. Finally we will see How to save a JMeter Test Plan, Running & stopping Test in JMeter.
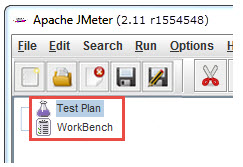
After opening JMeter. Firstly, our eyes go to these two Elements,

Test Plan
A test plan shows a series of Elements are useful in application tasting process. These Elements are: Thread Groups, logic controllers, sample generating controllers, listeners, timers, assertions, and configuration elements.

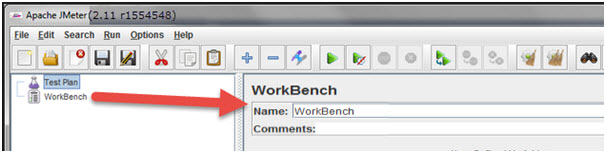
WorkBench
The WorkBench is simply a place which creates space to temporarily store test elements at the time of constructing test. In other word, it is a sandbox or portion of a test on which you are working on. That’s why, if the designed test in the WorkBench is ready to proceed, copy that and move it into Test Plan. Jmeter only save the contents of Test Plan not WorkBench.
WorkBench keeps non-test Elements too: Http Mirror Server and Http Mirror Server, these elements are not available in the Thread Group and Test Plan.

Add and Remove JMeter Elements
Adding Elements in Test Plan is very important step to execute your Test Plan. Without going through this, JMeter is unable to execute your Test Plan. A Test Plan is capable to include many Elements such as Listener, Controller, and Timer. To add Element in the Test Plan, right click on Test Plan which opens context-menu of Test Plan, then choose new elements from “Add” list. Alternatively, elements can be loaded from file and added by choosing the “merge” or “open” option.
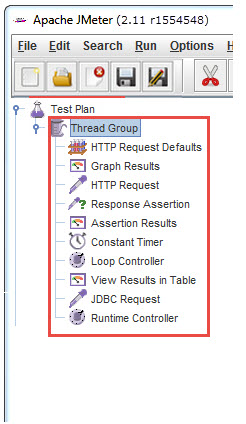
Before adding any Element in the Test Pane, it is necessary to add first a Thread Group element. The Thread Group says JMeter the number of users you need to simulate, how frequently the users should send requests, and how many requests they should send.
So, first let us know how to add the Thread Group element, right click on Test Plan which opens context-menu of Test Plan and then select Add –>Thread Group.
After adding the Thread Group, the Thread Group should display under Test Plan. If it is not visible, then “expand” the Test Plan tree by clicking on the Test Plan element.
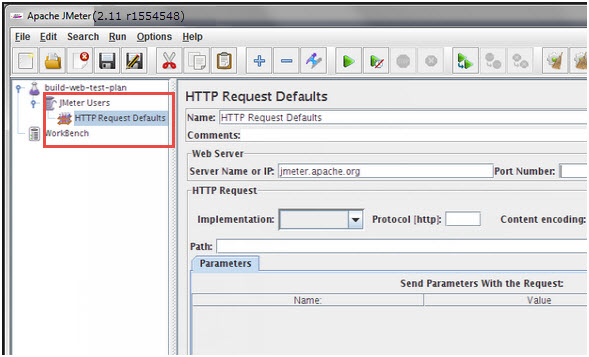
After defining Users, define the task on which they will work. Let us take an example of HTTP Request Defaults Element, add this element by right clicking on Users and then choose Add –>Config Element –> HTTP Request Defaults.

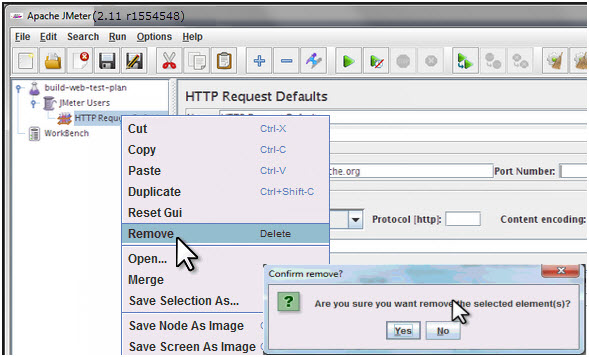
As like adding, you can also remove the Element which is not required. Let us take an example of “HTTP Request Defaults” Element. To remove this Element, right click on “HTTP Request Defaults” and from context-menu choose “Remove” option. It will display the dialog box with message “Are you sure you want to remove the selected Element”, if yes, then click on “Yes” button, or if no, then click on “No” button
Click Yes to confirm delete this element on message box.

Load and Save JMeter Elements
a) Load Elements
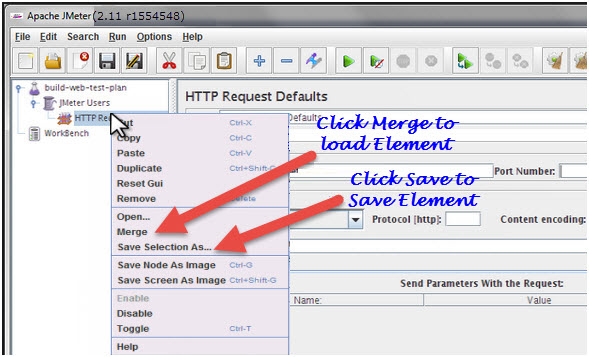
To load the element from existing file, choose the element from existing tree on which you want to load the other element, then right click on the selected element and click on “Merge” option. Choose the file from the existing saved Element. JMeter will merge the elements into the tree.

b) Save Elements
To save tree elements, choose the element from the tree, right click on an element and from the context menu option choose the “Save Selection As…”option. JMeter will save the selected element, plus all child elements beneath it. Created file cannot be saved in jmeter by default; you have to explicitly save the element.
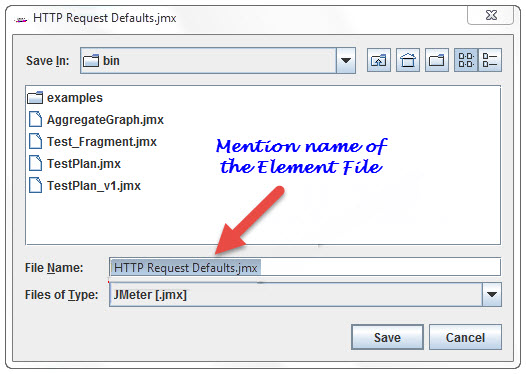
When you save the element, it will save with the default name of the element, you can save with the same name or you can change it. For example, The figure below shows the save dialog box with default name “HTTP Request Defaults.jmx”. Either you can give the same name or can change it before clicking on “Save” button.

JMeter Test Elements and Test plan are stored in *.JMX format. JMX is standing forJava Management Extensions.
Configure Jmeter Elements
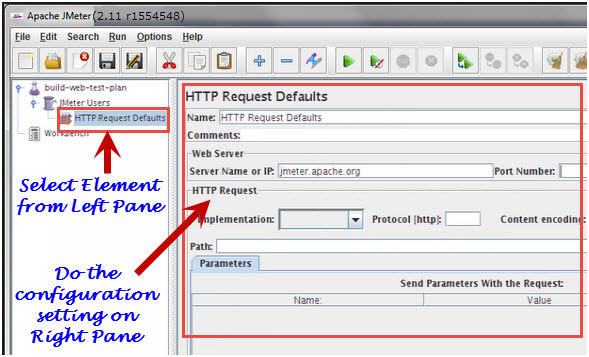
To configure any Element, first select the element of the Tree from Left Pane and do the configuration settings of the same element in the Right Pane.

You can configure any element of the Test Plan, using the element frame present in the right side of the JMeter window. These frames facilitate to configure the nature of the specific test element.
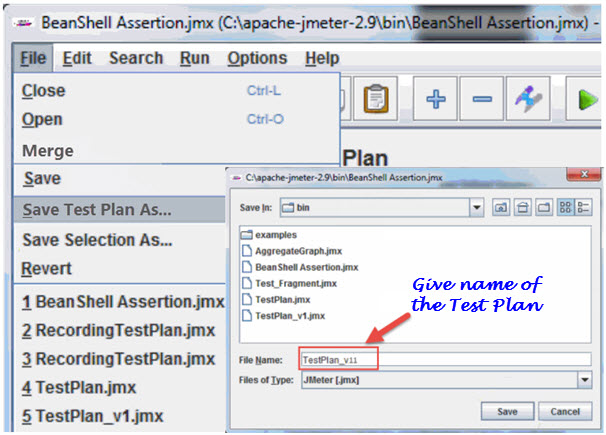
Saving the Test Plan
First save the Test Plan, before running a test. This saving helps to avoid surprising error comes at the time of running the test plan. To save the Test plan, first go to the File ->Save Test Plan. It displays the save Dialog box,give the file name of Test Plan and click on “Save”.

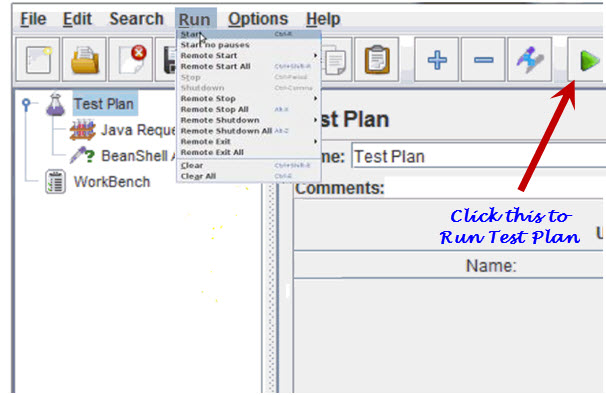
Running a Test Plan
To run the Test Plan, from top of the menu item click on Run à Start or from the keyboard press “Control+R”. Also, JMeter shows a small green button at the right hand side just under the menu bar – this is an alternative tool to Run Test Plan.

Stopping a Test
There are two ways to stop running test,
First Way: Click on “Stop”, or from keyboard press Control + ‘.’. This is an immediately process to stops the threads, if possible.
Second Way: Shutdown,or press –> Control + ‘,’. This appeals the threads to stop at the end of any present work.
If you enjoy reading article then you can subscribe our updates for FREE, just add your email id below. If you need any specific point to be cover around JMeter GUI in detailed then let me know in comments below. I will keep on updating the article for latest testing information.
After opening JMeter. Firstly, our eyes go to these two Elements,
- Test Plan
- Workbench
Test Plan
A test plan shows a series of Elements are useful in application tasting process. These Elements are: Thread Groups, logic controllers, sample generating controllers, listeners, timers, assertions, and configuration elements.
WorkBench
The WorkBench is simply a place which creates space to temporarily store test elements at the time of constructing test. In other word, it is a sandbox or portion of a test on which you are working on. That’s why, if the designed test in the WorkBench is ready to proceed, copy that and move it into Test Plan. Jmeter only save the contents of Test Plan not WorkBench.
WorkBench keeps non-test Elements too: Http Mirror Server and Http Mirror Server, these elements are not available in the Thread Group and Test Plan.
Add and Remove JMeter Elements
Adding Elements in Test Plan is very important step to execute your Test Plan. Without going through this, JMeter is unable to execute your Test Plan. A Test Plan is capable to include many Elements such as Listener, Controller, and Timer. To add Element in the Test Plan, right click on Test Plan which opens context-menu of Test Plan, then choose new elements from “Add” list. Alternatively, elements can be loaded from file and added by choosing the “merge” or “open” option.
Before adding any Element in the Test Pane, it is necessary to add first a Thread Group element. The Thread Group says JMeter the number of users you need to simulate, how frequently the users should send requests, and how many requests they should send.
So, first let us know how to add the Thread Group element, right click on Test Plan which opens context-menu of Test Plan and then select Add –>Thread Group.
After adding the Thread Group, the Thread Group should display under Test Plan. If it is not visible, then “expand” the Test Plan tree by clicking on the Test Plan element.
After defining Users, define the task on which they will work. Let us take an example of HTTP Request Defaults Element, add this element by right clicking on Users and then choose Add –>Config Element –> HTTP Request Defaults.
As like adding, you can also remove the Element which is not required. Let us take an example of “HTTP Request Defaults” Element. To remove this Element, right click on “HTTP Request Defaults” and from context-menu choose “Remove” option. It will display the dialog box with message “Are you sure you want to remove the selected Element”, if yes, then click on “Yes” button, or if no, then click on “No” button
Click Yes to confirm delete this element on message box.
Load and Save JMeter Elements
a) Load Elements
To load the element from existing file, choose the element from existing tree on which you want to load the other element, then right click on the selected element and click on “Merge” option. Choose the file from the existing saved Element. JMeter will merge the elements into the tree.
b) Save Elements
To save tree elements, choose the element from the tree, right click on an element and from the context menu option choose the “Save Selection As…”option. JMeter will save the selected element, plus all child elements beneath it. Created file cannot be saved in jmeter by default; you have to explicitly save the element.
When you save the element, it will save with the default name of the element, you can save with the same name or you can change it. For example, The figure below shows the save dialog box with default name “HTTP Request Defaults.jmx”. Either you can give the same name or can change it before clicking on “Save” button.
JMeter Test Elements and Test plan are stored in *.JMX format. JMX is standing forJava Management Extensions.
Configure Jmeter Elements
To configure any Element, first select the element of the Tree from Left Pane and do the configuration settings of the same element in the Right Pane.
You can configure any element of the Test Plan, using the element frame present in the right side of the JMeter window. These frames facilitate to configure the nature of the specific test element.
Saving the Test Plan
First save the Test Plan, before running a test. This saving helps to avoid surprising error comes at the time of running the test plan. To save the Test plan, first go to the File ->Save Test Plan. It displays the save Dialog box,give the file name of Test Plan and click on “Save”.
Running a Test Plan
To run the Test Plan, from top of the menu item click on Run à Start or from the keyboard press “Control+R”. Also, JMeter shows a small green button at the right hand side just under the menu bar – this is an alternative tool to Run Test Plan.
Stopping a Test
There are two ways to stop running test,
First Way: Click on “Stop”, or from keyboard press Control + ‘.’. This is an immediately process to stops the threads, if possible.
Second Way: Shutdown,or press –> Control + ‘,’. This appeals the threads to stop at the end of any present work.
If you enjoy reading article then you can subscribe our updates for FREE, just add your email id below. If you need any specific point to be cover around JMeter GUI in detailed then let me know in comments below. I will keep on updating the article for latest testing information.


