What are some of the challenges you faced with JMeter?

If a subsequent request rely on the cookie set by the previous request, the "cookie manager" element is required.


When setting up the "CSV Data Set Config", don't have any spaces in the variable names


Have you used any features of JMeter that gave you greater flexibility?

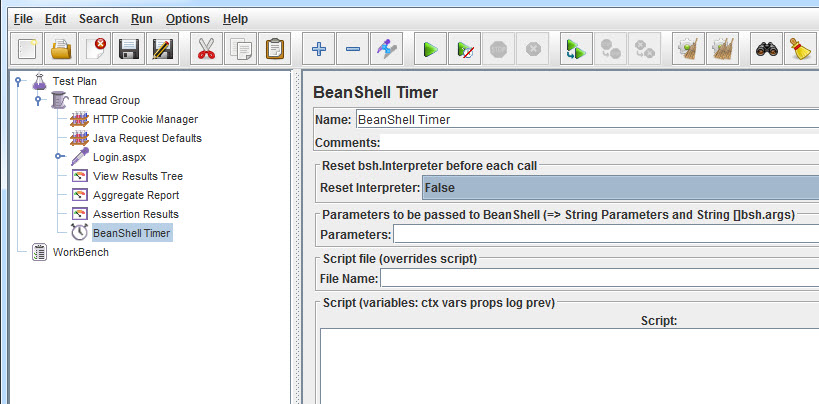
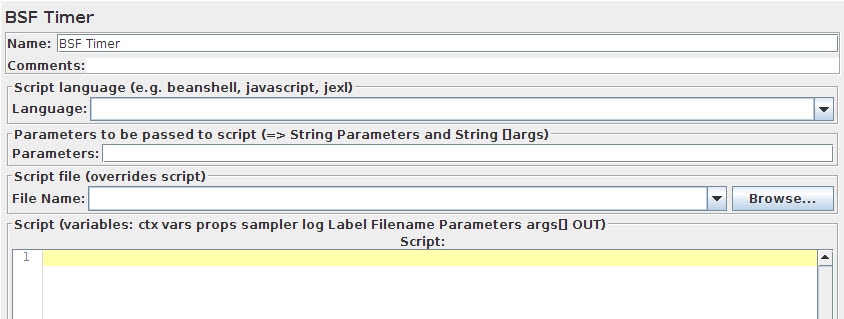
A. Yes. The JMeter supports BeanShell scripting for greater flexibility. The BeanShell is a small, free, embeddable Java source interpreter with object scripting language features, written in Java.

If you want to output all the order ids extracted out of the response messages for the response messages shown below

//OrderResponse>
//rderId>50013914

//responseCode>SUCCESS
//OrderResponse>

An XPath Extractor can be used to extract the "orderId" from the response message and store it in a variable named "orderId" as shown below.


Now, the BeanShell PostProcessor can use the extracted "orderId" variable and write to a file (e.g. C:\\Temp\\order-processing\id.txt ) as shown below.


You could do a lot more powerful things by writing your own embedded scripting with the BeanShell. For example, You can create your own file named MyBeanShell.bshr and copy it to $JMETER_HOME\bin folder. The MyBeanShell.bshr will have functions like 

getReportStartDate()
{

import java.text.SimpleDateFormat;

cal = Calendar.getInstance();
cal.add(Calendar.DATE, -10);
sdf = new SimpleDateFormat("dd-MMMM-yyyy");
return sdf.format(cal.getTime());

}

isTenth(int loopCounter)
{

returnValue = false;

if (loopCounter % 10 == 0)
{
returnValue = true;
}

return returnValue;

}

You could invoke these functions from your JMeter elements like

${__BeanShell(return getReportStartDate();)}


Also, note that pre-defined functions like __time can be used as shown above. There are also handy JMeter plugins from Google code at http://code.google.com/p/jmeter-plugins/ containing useful functions, listeners, samplers, etc. Just download the zip file and extract the "JMeterPlugins.jar" into $JMETER_HOME\lib\ext folder. This plugin features are prefixed with jp@gc.


 How do you ensure re-usability in your JMeter scripts?
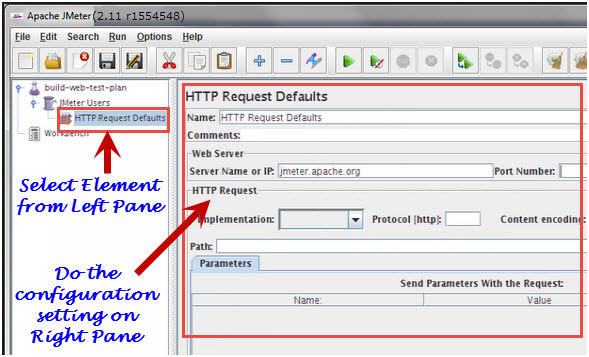
Using config elements like "CSV Data Set Config", "User Defined Variables", etc for greater data reuse.
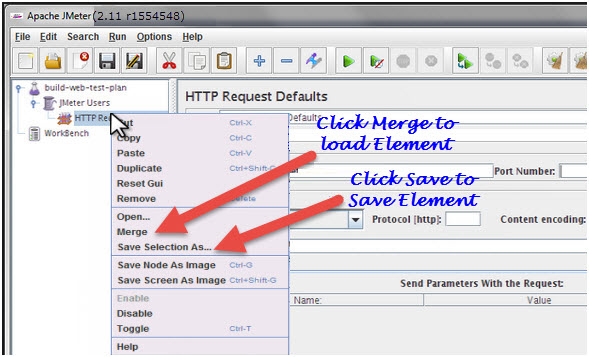
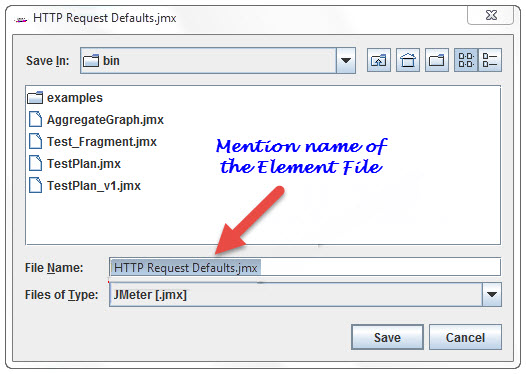
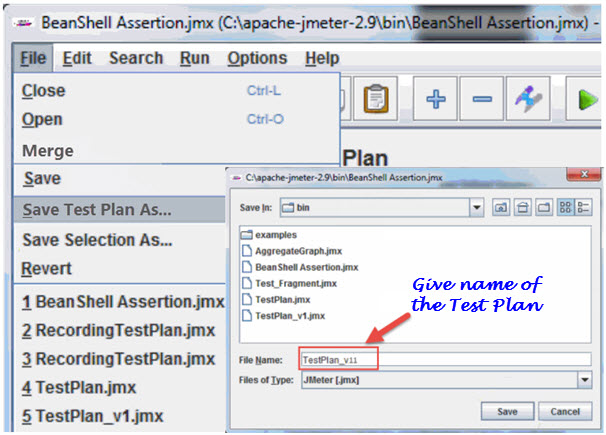
Modularizing shared tasks and invoking them via a "Module Controller".
Writing your own BeanShell functions, and reusing them

Creating Rendezvous Point in JMeter

Rendezvous point in load testing is a point where an expected number of users wait till all of them are emulated, and then all virtual users send request at one time. This point is created to check the behavior of application where it might get a huge number of requests at a particular time. Its very important to test a Peak Load Scenario when approaching towards load testing a web application.

Jmeter, being the best alternative to commercial Load Testing Tools in the Open Source Arena, here is a way to find this "Rendezvous" point in Jmeter.

The tree elements for our sample test plan would be like

Test Plan
Thread Group - Lets give Number of Threads to be '200'
HTTP Request - Lets hit http://www.ourgoalplan.com with 200 users 

Synchronizing Timer - Add this timer and enter '50' as the number of virtual users we want to send request to the server simultaneously
View Result Tree - Use this listener to monitor the performance of the application
Aggregate Report - Use this listener to see the overall performance

Now, as we wanted our application to be hit by 200 virtual users, with the pre condition that 50 users should hit the site in four sets i.e. 50, 50, 50 and 50 which makes 200. Press ctrl + R to run the script after saving.

We would see the users getting emulated and sending request in the same pattern as we wanted by creating a Rendezvous Point.

PS : Number of threads in the Thread Group should always be greater than the 'Number of Simultanous Users to Group By' to make sure that Jmeter doesn't throw any unhandled exception. Its always good to be on the safer side when going forward with Open Source Tools.

Usage of _intSum and _longSum in JMeter

intSum:This is a built in function in Jmeter which helps to add multiple arguments/integer Values.
Drawback It can only add two real numbers. For float(12.23, 43.22), it is going to show an error message.
Arguments:

First Argument - The First integer value/Jmeter Variable

Second Argument – The Second integer Value/Jmeter Variable

. . . Nth Argument – The Nth integer value/Jmeter Variable

Last Argument – A variable or a reference name which will store the value for the addition and can be reused later.


Scenario:If User wants to increment a counter value by 2 with each iteration.

{__intSum(${tj_counter},2,tj_counter)}

Explanation:

1)__intSum- function name

2)${tj_counter}- First argument

3)1- Second Argument

4)tj_counter- Last Argument is the Reference name where the addition value get stored.
FAQ:

Is the function __counter better than __intSum?Yes Of course. Even __intSum can be used to increment a number with each thread which is quite similar to __counter function. But __counter function starts the counter with 1 and increment it by 1 and with __intSum we can start it from any number and increment it by any value.

Is there any scenario we can think of?Yeah. It will be helpful while user input needs any addition of any numbers. In that case we can simply add two or multiple values and use the variable to reference it any filed we want to.

longSum:

A Jmeter built in function which will help to add multiple long values.
Drawback - It can not take Float Value as arguments.
Arguments:

First Argument - The First long value
Second Argument – The Second long Value
. . . Nth Argument – The Nth long value
Last Argument – A variable or a reference name which will store the value for the addition and can be reused later.

Scenario:If User wants to increment a certain value by a certain number(Say to match the session ID with each iteration.)

__longSum(${tj_sessionid},65345,tj_sessionid)}

Explanation:

1)__longSum- Function Name

2)${tj_sessionid}- First argument

3)65345- Second Argument

4)tj_sessionid- Last Argument is the variable name where the addition value get stored and can be reused later

Timers in JMeter

Using Timers,JMeter delays each request while sending which is made by thread. Because of this reason, Timer resolves the server overload issue.

When you add more than one timer to a Thread Group, JMeter keeps the amount of the timers and pauses for that amount of time before executing the samplers to which the timers apply. Timers can be added as children of samplers or controllers in order to limit the samplers to which they are participated.

Types of Timers
  1. Constant Timer
  2. Constant Throughput Timer
  3. Uniform Random Timer
  4. Gaussian Random Timer
  5. BeanShell Timer
  6. Poisson Random Timer
  7. BSF Timer
  8. JSR223 Timer
  9. Synchronizing Timer
Constant Timer:
To delay every user request for the same amount of time use Constant Timer.


Constant Throughput Timer:

Constant Throughput Timer presents random delays between requests in a manner that a load/stress of necessary throughput is sent to the application. Figure shows, Constant Throughput Timer for 60 requests per minute.


Uniform Random Timer:To delay every user request for random amount of time use Uniform Random Timer with every time interval having the same possibility of occurring.


In the above figure,
Random Delay Maximum Value: Maximum random number of milliseconds to delay
Constant Delay Offset Value: Additional value


Gaussian Random Timer:
To delay every user request for random amount of time use Gaussian Random Timer with most of the time intervals happening near a specific value.

Gaussian Random means with most of the time intervals arising near a specific value i.e. constant interval & varying between constant interval + deviation.


In the above figure,
Deviations (milliseconds): A parameter of Gaussian Distribution Function
Constant Delay Offset (milliseconds): Additional value


BeanShell Timer:Between each user request, the BeanShell Timer can be used to create a delay time. (We will see each timer in detailed in upcoming articles with example.)


Poisson Random Timer:
To pause each and every thread request for random amount of time use Poisson Random Timer with most of the time intervals occurring close a specific value.


Sum of Poission Distributed Value and Offset Value generate Total Delay value.


BSF Timer:Between each user request, the BSF Timer can be used to create a delay time usingBSF scripting language.


JSR223 Timer:
Between each user request, the JSR223 Timer can be used to create a delay time using a JSR223 scripting language.


Synchronizing Timer:Synchronizing Timer is used to synchronize requests of various threads, means; it will increase delays between requests. So that, all threads fire at the same time there for regenerating heavy load bursts on your application. It is same like Rendezvous Point in LoadRunner and create big load at various places in JMeter plan

Grinder Tool

The Grinder, a Java Load Testing Framework

What is The Grinder?
The Grinder is a JavaTM load testing framework that makes it easy to run a distributed test using many load injector machines. It is freely available under a BSD-style open-source license.

The latest news, downloads, and mailing list archives can be found on SourceForge.net.
Key features
Generic Approach Load test anything that has a Java API. This includes common cases such as HTTP web servers, SOAP and REST web services, and application servers (CORBA, RMI, JMS, EJBs), as well as custom protocols.
Flexible Scripting Test scripts are written in the powerful Jython and Clojure languages.
Distributed Framework A graphical console allows multiple load injectors to be monitored and controlled, and provides centralised script editing and distribution.
Mature HTTP Support Automatic management of client connections and cookies. SSL. Proxy aware. Connection throttling. Sophisticated record and replay of the interaction between a browser and a web site.

Dynamic Scripting
Test scripts are written using a dynamic scripting language, and specify the tests to run. The default script language is Jython, a Java implementation of the popular Python language.

The script languages provide the following capabilities:Test any Java code

The Grinder 3 allows any code (Java, Jython, or Clojure) code to be encapsulated as a test. Java libraries available for an enormous variety of systems and protocols, and they can all be exercised using The Grinder.Dynamic test scripting

The Grinder 2 worker processes execute tests sequentially in a fixed order, and there is limited support in some of the The Grinder 2 plug-ins for checking test results. The Grinder 3 allows arbitrary branching and looping and makes test results directly available to the test script, allowing different test paths to be taken depending on the outcome of each test.

The Grinder 2 HTTP plug-in's string bean feature provides simple support for requests that contain dynamic data. The Grinder 3 can use the full power of Jython or Clojure to create dynamic requests of arbitrary complexity.

The powerful scripting removes the need to write custom plug-ins that extend The Grinder engine. Although plug-ins are no longer responsible for performing tests, they can still be useful to manage objects that the tests use. For example, the standard HTTP plug-in manages a pool of connections for each worker thread, and provides an HTTPRequest object that makes use of these connections.

Contents of JMeter GUI

What is mean by Test Plan & WorkBench in JMeter. We are covering how to add and remove JMeter Elements, How to Load and Save JMeter Elements. Alongwith that we are covering how we configure Jmeter Elements. Finally we will see How to save a JMeter Test Plan, Running & stopping Test in JMeter.

After opening JMeter. Firstly, our eyes go to these two Elements,

  • Test Plan
  • Workbench


Test Plan

A test plan shows a series of Elements are useful in application tasting process. These Elements are: Thread Groups, logic controllers, sample generating controllers, listeners, timers, assertions, and configuration elements.


WorkBench
The WorkBench is simply a place which creates space to temporarily store test elements at the time of constructing test. In other word, it is a sandbox or portion of a test on which you are working on. That’s why, if the designed test in the WorkBench is ready to proceed, copy that and move it into Test Plan. Jmeter only save the contents of Test Plan not WorkBench.

WorkBench keeps non-test Elements too: Http Mirror Server and Http Mirror Server, these elements are not available in the Thread Group and Test Plan.


Add and Remove JMeter Elements
Adding Elements in Test Plan is very important step to execute your Test Plan. Without going through this, JMeter is unable to execute your Test Plan. A Test Plan is capable to include many Elements such as Listener, Controller, and Timer. To add Element in the Test Plan, right click on Test Plan which opens context-menu of Test Plan, then choose new elements from “Add” list. Alternatively, elements can be loaded from file and added by choosing the “merge” or “open” option.

Before adding any Element in the Test Pane, it is necessary to add first a Thread Group element. The Thread Group says JMeter the number of users you need to simulate, how frequently the users should send requests, and how many requests they should send.

So, first let us know how to add the Thread Group element, right click on Test Plan which opens context-menu of Test Plan and then select Add –>Thread Group.

After adding the Thread Group, the Thread Group should display under Test Plan. If it is not visible, then “expand” the Test Plan tree by clicking on the Test Plan element.

After defining Users, define the task on which they will work. Let us take an example of HTTP Request Defaults Element, add this element by right clicking on Users and then choose Add –>Config Element –> HTTP Request Defaults.


As like adding, you can also remove the Element which is not required. Let us take an example of “HTTP Request Defaults” Element. To remove this Element, right click on “HTTP Request Defaults” and from context-menu choose “Remove” option. It will display the dialog box with message “Are you sure you want to remove the selected Element”, if yes, then click on “Yes” button, or if no, then click on “No” button

Click Yes to confirm delete this element on message box.


Load and Save JMeter Elements
a) Load Elements
To load the element from existing file, choose the element from existing tree on which you want to load the other element, then right click on the selected element and click on “Merge” option. Choose the file from the existing saved Element. JMeter will merge the elements into the tree.


b) Save Elements
To save tree elements, choose the element from the tree, right click on an element and from the context menu option choose the “Save Selection As…”option. JMeter will save the selected element, plus all child elements beneath it. Created file cannot be saved in jmeter by default; you have to explicitly save the element.

When you save the element, it will save with the default name of the element, you can save with the same name or you can change it. For example, The figure below shows the save dialog box with default name “HTTP Request Defaults.jmx”. Either you can give the same name or can change it before clicking on “Save” button.


JMeter Test Elements and Test plan are stored in *.JMX format. JMX is standing forJava Management Extensions.

Configure Jmeter Elements
To configure any Element, first select the element of the Tree from Left Pane and do the configuration settings of the same element in the Right Pane.


You can configure any element of the Test Plan, using the element frame present in the right side of the JMeter window. These frames facilitate to configure the nature of the specific test element.

Saving the Test Plan
First save the Test Plan, before running a test. This saving helps to avoid surprising error comes at the time of running the test plan. To save the Test plan, first go to the File ->Save Test Plan. It displays the save Dialog box,give the file name of Test Plan and click on “Save”.


Running a Test Plan
To run the Test Plan, from top of the menu item click on Run à Start or from the keyboard press “Control+R”. Also, JMeter shows a small green button at the right hand side just under the menu bar – this is an alternative tool to Run Test Plan.


Stopping a Test

There are two ways to stop running test,

First Way: Click on “Stop”, or from keyboard press Control + ‘.’. This is an immediately process to stops the threads, if possible.

Second Way: Shutdown,or press –> Control + ‘,’. This appeals the threads to stop at the end of any present work.


If you enjoy reading article then you can subscribe our updates for FREE, just add your email id below. If you need any specific point to be cover around JMeter GUI in detailed then let me know in comments below. I will keep on updating the article for latest testing information.

How to connect the PC Host with PC11 if fire wall is the bottleneck?

How to connect the PC Host with PC11 if fir wall is the bottleneck?


What is Junit Test Framework?

JUnit is a Regression Testing Framework used by developers to implement unit testing in Java and accelerate programming speed and increase the quality of code. JUnit Framework can be easily integrated with either of the followings:

1.Eclipse
2.Ant
3.Maven

Features:JUnit test framework provides following important features
  1. Fixtures
  2. Test suites
  3. Test runners
  4. JUnit classes
  5. Fixtures
Fixtures is a fixed state of a set of objects used as a baseline for running tests. The purpose of a test fixture is to ensure that there is a well known and fixed environment in which tests are run so that results are repeatable. It includes

setUp() method which runs before every test invocation.

tearDown() method which runs after every test method.

Let's check one example:import junit.framework.*; public class JavaTest extends TestCase { protected int value1, value2; // assigning the values protected void setUp(){ value1=3; value2=3; } // test method to add two values public void testAdd(){ double result= value1 + value2; assertTrue(result == 6); } }

Test suite:

Test suite means bundle a few unit test cases and run it together. In JUnit, both @RunWith and @Suite annotation are used to run the suite test. Here is an example which uses TestJunit1 & TestJunit2 test classes.import org.junit.runner.RunWith; import org.junit.runners.Suite; //JUnit Suite Test @RunWith(Suite.class) @Suite.SuiteClasses({ TestJunit1.class ,TestJunit2.class }) public class JunitTestSuite { }
import org.junit.Test; import org.junit.Ignore; import static org.junit.Assert.assertEquals; public class TestJunit1 { String message = "Robert"; MessageUtil messageUtil = new MessageUtil(message); @Test public void testPrintMessage() { System.out.println("Inside testPrintMessage()"); assertEquals(message, messageUtil.printMessage()); } }
import org.junit.Test; import org.junit.Ignore; import static org.junit.Assert.assertEquals; public class TestJunit2 { String message = "Robert"; MessageUtil messageUtil = new MessageUtil(message); @Test public void testSalutationMessage() { System.out.println("Inside testSalutationMessage()"); message = "Hi!" + "Robert"; assertEquals(message,messageUtil.salutationMessage()); } }

Test runner:

Test runner is used for executing the test cases. Here is an example which assumes TestJunit test class already exists.import org.junit.runner.JUnitCore; import org.junit.runner.Result; import org.junit.runner.notification.Failure; public class TestRunner { public static void main(String[] args) { Result result = JUnitCore.runClasses(TestJunit.class); for (Failure failure : result.getFailures()) { System.out.println(failure.toString()); } System.out.println(result.wasSuccessful()); } }

JUnit classes:

JUnit classes are important classes which is used in writing and testing JUnits. Some of the important classes are

Assert which contain a set of assert methods.

TestCase which contain a test case defines the fixture to run multiple tests.

TestResult which contain methods to collect the results of executing a test case

Run Vugen from command prompt in load runner

Run Vugen from command prompt

Here is the command to run vugen from the command prompt

1. Go to where the Vugen is installed and navigate to the 'bin' folder

C:\Program Files\HP\Virtual User Generator\bin

2. Run the following command there
mmdrv.exe -usr [Full path of the script name.usr]

lr_param_sprintf security issue when run over a firewall(Error: CCI security error: You are running under secure mode and the function lr_param_sprintf is not allowed in this mode. )

The function lr_param_sprintf sometimes causes a security issue in the script when run from Performance Center. 

Error Message 
Error: CCI security error: You are running under secure mode and the function lr_param_sprintf is not allowed in this mode.

This function causes an issue in Performance Center due to the way the function works and the way the Load Generators have been setup in the environment as this function does not work over a firewall.
Solution:This is an example of how function could be to generate a timestamp value – 

lr_param_sprintf( "timeStamp" , "%ld", time(&t) ); 
An easier and workable way of which is

char strTime[10]; //timestamp variable
/*
-- -- -- -- -- -- -- --
Other code goes here
-- -- -- -- -- -- -- --
*/
lr_save_string( (char*)itoa( time(&t), strTime, 10 ), "timeStamp" );